

How To Change Resolution On A Ptzoptics Camera
Every PTZ camera operator should exist concerned with getting the best possible picture from their cameras. This is done, in part, by adjusting the camera's exposure and additional settings to adjust the picture quality. As a PTZ camera operator, you lot should know your camera and communicate with your squad most basic parameters.
An ideal starting identify for whatever project is to outline the projection's resolution and frame rate. The project should have 1 master resolution and frame charge per unit that is used with the cameras, the video product software, and whatever recording or live-streaming devices. Once you know the desired resolution and frame rate for the projection, you should make sure that every camera in the organization is prepare to the exact aforementioned setting. The last thing you want is to have 1 camera that is set at a different frame rate from the rest, because that will create a noticeable inconsistency with your video. If yous have most of your cameras set to 30 frames per second for instance, and simply one photographic camera ready to threescore frames per second, the camera with 60 frames per second will take a noticeable difference in the amount of mistiness captured by the video. The next step is to dial in your camera'due south exposure in social club to get the near out of the lighting atmospheric condition available. Knowing the project's resolution and frame rate volition permit you to utilise the 180 ° shutter speed rule equally a starting point to tune your camera's exposure.
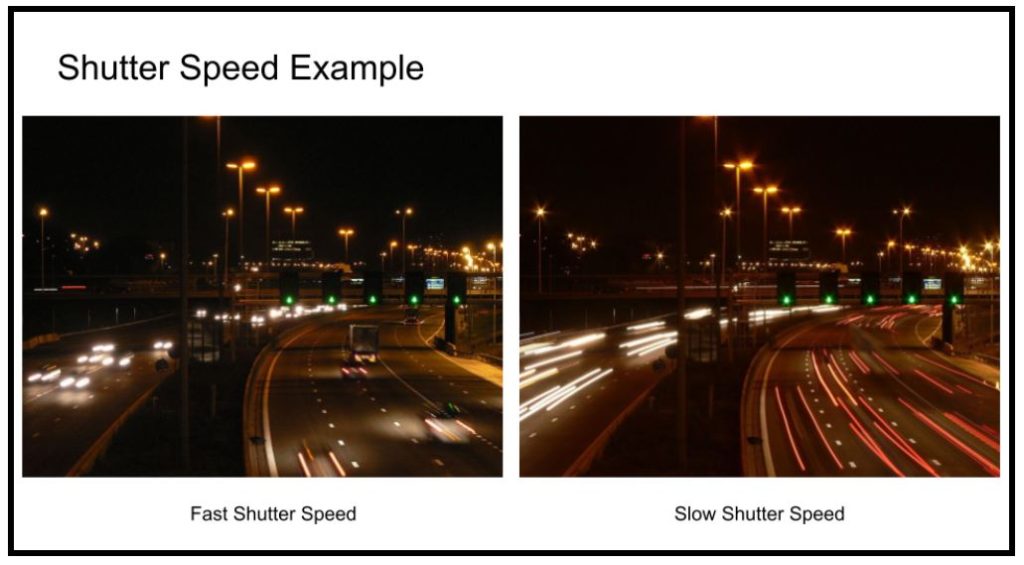
Shutter Speed Instance
The 180 ° shutter speed rule
The 180 ° shutter speed rule is designed to accomplish a normal corporeality of motion blur from the video yous are capturing from your camera. Every camera has a shutter that is used to control the amount of light that is exposed to the photographic camera'south image sensor. The shutter speed is a controllable length of time that the shutter opens and closes each second. The epitome beneath shows the difference between two shutter speeds when taking a film.

The 180-caste shutter speed dominion
When shooting video, the shutter speed will alter the corporeality of blur that is visible when objects move. Video with a shutter speed that is also low will accept an unrealistic corporeality of blur. Video with a shutter speed that is too high will have almost no mistiness even when objects are moving quickly. The 180° shutter speed rule helps videographers establish a realistic amount of blur based on the number of frames your camera is capturing. This dominion has become a standard in the picture industry to lucifer what the human eye is used to seeing in real life.
The proficient news is that the 180° shutter speed rule is easy to apply. All you demand to do is double your project's frame rate to go your recommended shutter speed per second. For instance, if your project's frame charge per unit is 30 frames per second, your shutter speed should be 1/60th of a second. If your projection'southward frame rate is 60 frames per second, your shutter speed should be one/120th of a second.
Adjusting the camera'south discontinuity
When information technology comes to properly balance a camera's exposure, your primary tools are discontinuity and shutter speed. The aperture is the opening of the camera's iris located in the lens. Similar to shutter speed, adjusting the aperture will increment or decrease the amount of light sent to the photographic camera'due south image sensor. The aperture can take an effect on the depth of field your camera captures. A large discontinuity will create a shallow depth of field and a small aperture will create a big depth of field.
Most PTZ cameras are used to capture video footage and unlike photography, you will likely lock the shutter speed and frame rate in order to capture video with the proper amount of motion blur. Therefore, the discontinuity is your main tool to balance the exposure considering the shutter speed is essentially locked. One starting bespeak for aperture adjustment is to use your PTZ photographic camera'due south shutter speed priority selection. The shutter speed priority choice allows you to lock the shutter speed at a specific rate and allow the photographic camera to automatically adjust the aperture. You lot can exercise this to get an idea of what the camera thinks the ideal discontinuity is, so switch the camera into manual style to tweak the setting.
About exposure setting modes to adjust inside ]your PTZ photographic camera using the on-screen display (OSD) menu. Additional settings may include backlight, gain limit, anti-flicker, meter, and "Dynamic Range Control" (DRC), a engineering used to compensate for problems in your exposure due to a variety of lighting scenarios. The backlight feature removes unwanted backlighting from a specific scene. The gain limit o increases or decreases the gain used to enhance the film's brightness. The anti-flicker selection is used when the lighting in your space causes a flicker in the video.
Photographic camera Settings for Exposure
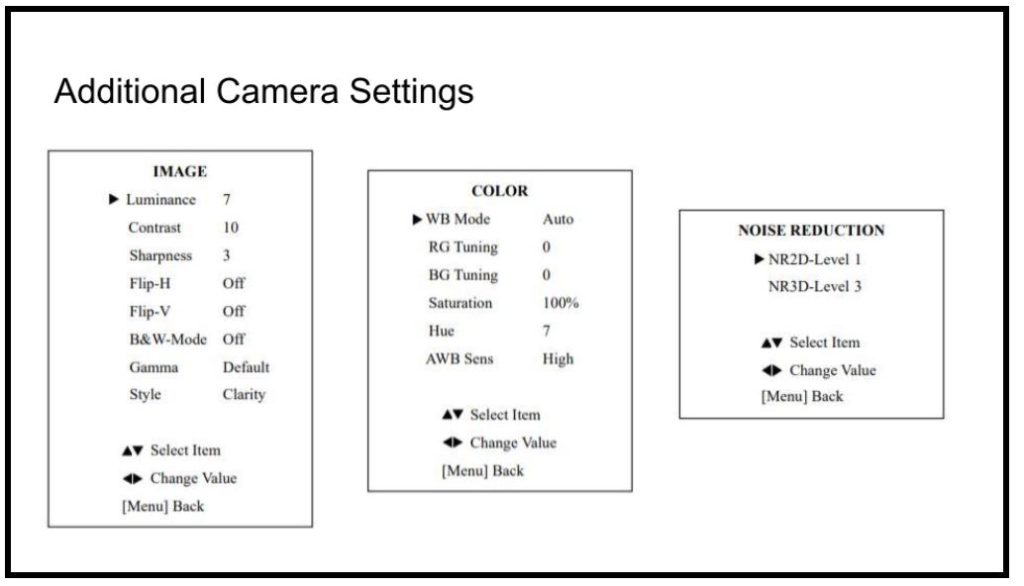
Additional Camera Settings
Once you lot have tuned your aperture and shutter speed, you may find it useful to adjust additional video settings. Near PTZ cameras will permit yous to adjust the image, the color, and some noise reduction functions. These settings permit y'all to digitally enhance the paradigm that is produced past your exposure settings.
At this point, the best place to start is to white residuum your camera. White balancing your camera allows the photographic camera to place what a white object should look similar in your environment and tune the rest of the colors in your camera. Check to run into if your camera features a "one-button" white balance selection. This will let you to zoom into a white object or sheet of paper and have your photographic camera automatically make a white rest adjustment.
The side by side step is to melody the colors coming from your camera. This is an of import step especially if you lot are attempting to colour match multiple cameras.When colour matching cameras, apply a color chart to provide authentic representations of color that you tin can use to see where y'all need to brand adjustments.. A color chart tin can be placed in a common area and zoomed into with all of your PTZ cameras. Some PTZ cameras also offer the ability to accommodate the color of the photographic camera based on the color temperature of your lights. Once yous have properly adjusted 1 camera, write the settings down and try applying the aforementioned settings to additional cameras in your system. You lot may find that each camera has a unique viewpoint that requires aligning. As a best practice, apply the colour settings of the camera that is properly adjusted and look good, to change the settings on the rest of your cameras.
Once you lot feel good nigh the camera's color settings, motion on to image enhancement. The settings in this expanse include effulgence, contrast, luminance, gamma, and sharpness. Contrast and luminance are a scrap similar the aperture and shutter speed except the changes are not being made to the exposure, but a digital reproduction being output past the camera. Y'all can use the contrast adjustment to add dimension to your video. Skillful contrast should add a total range of colour tones with accurate whites and blacks.
In an ideal earth, your photographic camera's exposure should await perfect past but using the shutter speed and aperture. Just, in many cases, boosted settings, such as dissimilarity and luminance are required to digitally heighten your image in cases where you have low light or other challenging environments. The luminance tin exist used to add or remove brightness from your images. Yous should try to residuum contrast and luminance until you get a well-baked, abrupt motion picture.
Tip : If you are using a green screen, contrast can help remove some of the stray pixels showing up through your chroma key.
It's worth noting that many video production systems offer their ain color correction tools. For example, vMix offers a waveform monitor and a vectorscope that tin be used to manually color right multiple cameras. This is especially useful if you are using cameras from multiple camera manufacturers. Colour correction tools permit you to see the raw data that is coming into your video product system. Using this data, you lot tin apply color corrections and filters in order to properly friction match the color from multiple cameras.
Here is a camera settings checklist:
- Set up cameras in their proper location
- Test with the lighting yous plan to record with
- Configure the camera's exposure settings (shutter speed and discontinuity)
- White balance the photographic camera
- Cheque the colors using a colour checker
- Compare the video of multiple cameras if necessary
- Color match cameras with the video production software yous programme to employ
Digital dissonance reduction is a last aligning setting you may require. . Depending on how much gain and luminance you are using, you may come across digital pixelation. Digital noise is essentially pixels that are non getting plenty light in your CMOS sensor; the pixels flicker from fourth dimension to time. The kickoff mode to remove digital dissonance is to reduce the amount of proceeds and luminance you are using. If you lot can't exercise that, effort digital noise reduction options.
Fundamental Takeaways:
- Follow the 180-degree shutter speed rule as a starting point for tuning your camera'due south exposure
- Tuning the shutter speed and iris are the near important commencement steps toward setting upwardly the right camera exposure
- Using a colour checker yous can tune the white remainder and colour settings on your cameras in the space yous plan to use them
- A waveform monitor and a vectorscope are tools you tin can use to help color match and tune your video
Larn more than about PTZ Cameras
- Meet how PTZ cameras are transforming video product here
- Larn loftier level, what a PTZ camera actually is here
- Learn about every essential part of a PTZ camera hither
- Learn well-nigh who is using PTZ cameras here
- Learn well-nigh the different types of PTZ cameras here
- Larn how to use an IR remote command with your PTZ cameras here
- Acquire virtually the various PTZ photographic camera control options here
- Acquire how to mount a PTZ camera here
- Acquire how to ready the exposure of your PTZ camera here
- Learn virtually PTZ camera operation best practices hither
- Larn about all the latest PTZ camera features here
- Acquire how to automate PTZ camera controls here
- Learn more about Networking PTZ cameras here
- Larn about the new ePTZ photographic camera technology here
- Larn near how innovations in video product are changing the industry here
- Learn how to utilise PTZ cameras for remote production here
Download the PTZ Camera Operator Handbook hither
Source: https://streamgeeks.us/setting-ptz-camera-exposure/
Posted by: herreravised1943.blogspot.com
0 Response to "How To Change Resolution On A Ptzoptics Camera"
Post a Comment