

How To Make A Rpi 0 Security Camera
While in that location are countless commercial CCTV home security systems on the marketplace, building your own to DIY version with a Raspberry Pi (or other single-board computer) offers the advantage of customizability to suit your verbal purposes.
A special Linux distro chosen motionEyeOS makes it like shooting fish in a barrel to prepare up your security system with i or more cameras. It can then discover motility from the photographic camera view and transport alerts via email or button notification. We'll show you how to get everything up and running.
What You lot Will Need to Fix a CCTV System
- A Raspberry Pi: any model volition work, including Pi Zero and Compute Module
- A USB webcam, Raspberry Pi Camera Module, or the High Quality Camera module
ane. Install motionEyeOS
Rather than beingness an application, motionEyeOS is a self-contained operating system, i of many Raspberry Pi OSes. Beginning, you demand to find the right version for your Raspberry Pi model. Go to the listing of supported devices and click on the latest version for your board to download the disk image every bit a .xz file.
There are ii primary ways of installing motionEyeOS on Raspberry Pi. The motionEyeOS website offers an epitome-writing utility for Linux and macOS computers to write the disk image to a microSD carte to utilize in your Raspberry Pi. This offers the optional setup of a wireless network connection and setting a static IP address. For more details, encounter the installation guide.
The second method – which we volition use hither, since it also works on Windows machines – is to write the disk epitome using the standard Raspberry Pi Imager tool, downloadable from the Raspberry Pi website.
Using a built-in card reader or USB adaptor, insert your microSD menu to mount it on your computer and open Raspberry Pi Imager. Click on Choose Os, then scroll to the bottom of the list to select Use custom.
Browse to the motionEyeOS.xz file you downloaded earlier. Now click on Choose SD Card and select your inserted microSD carte, probably chosen something like Generic Storage Device Media.
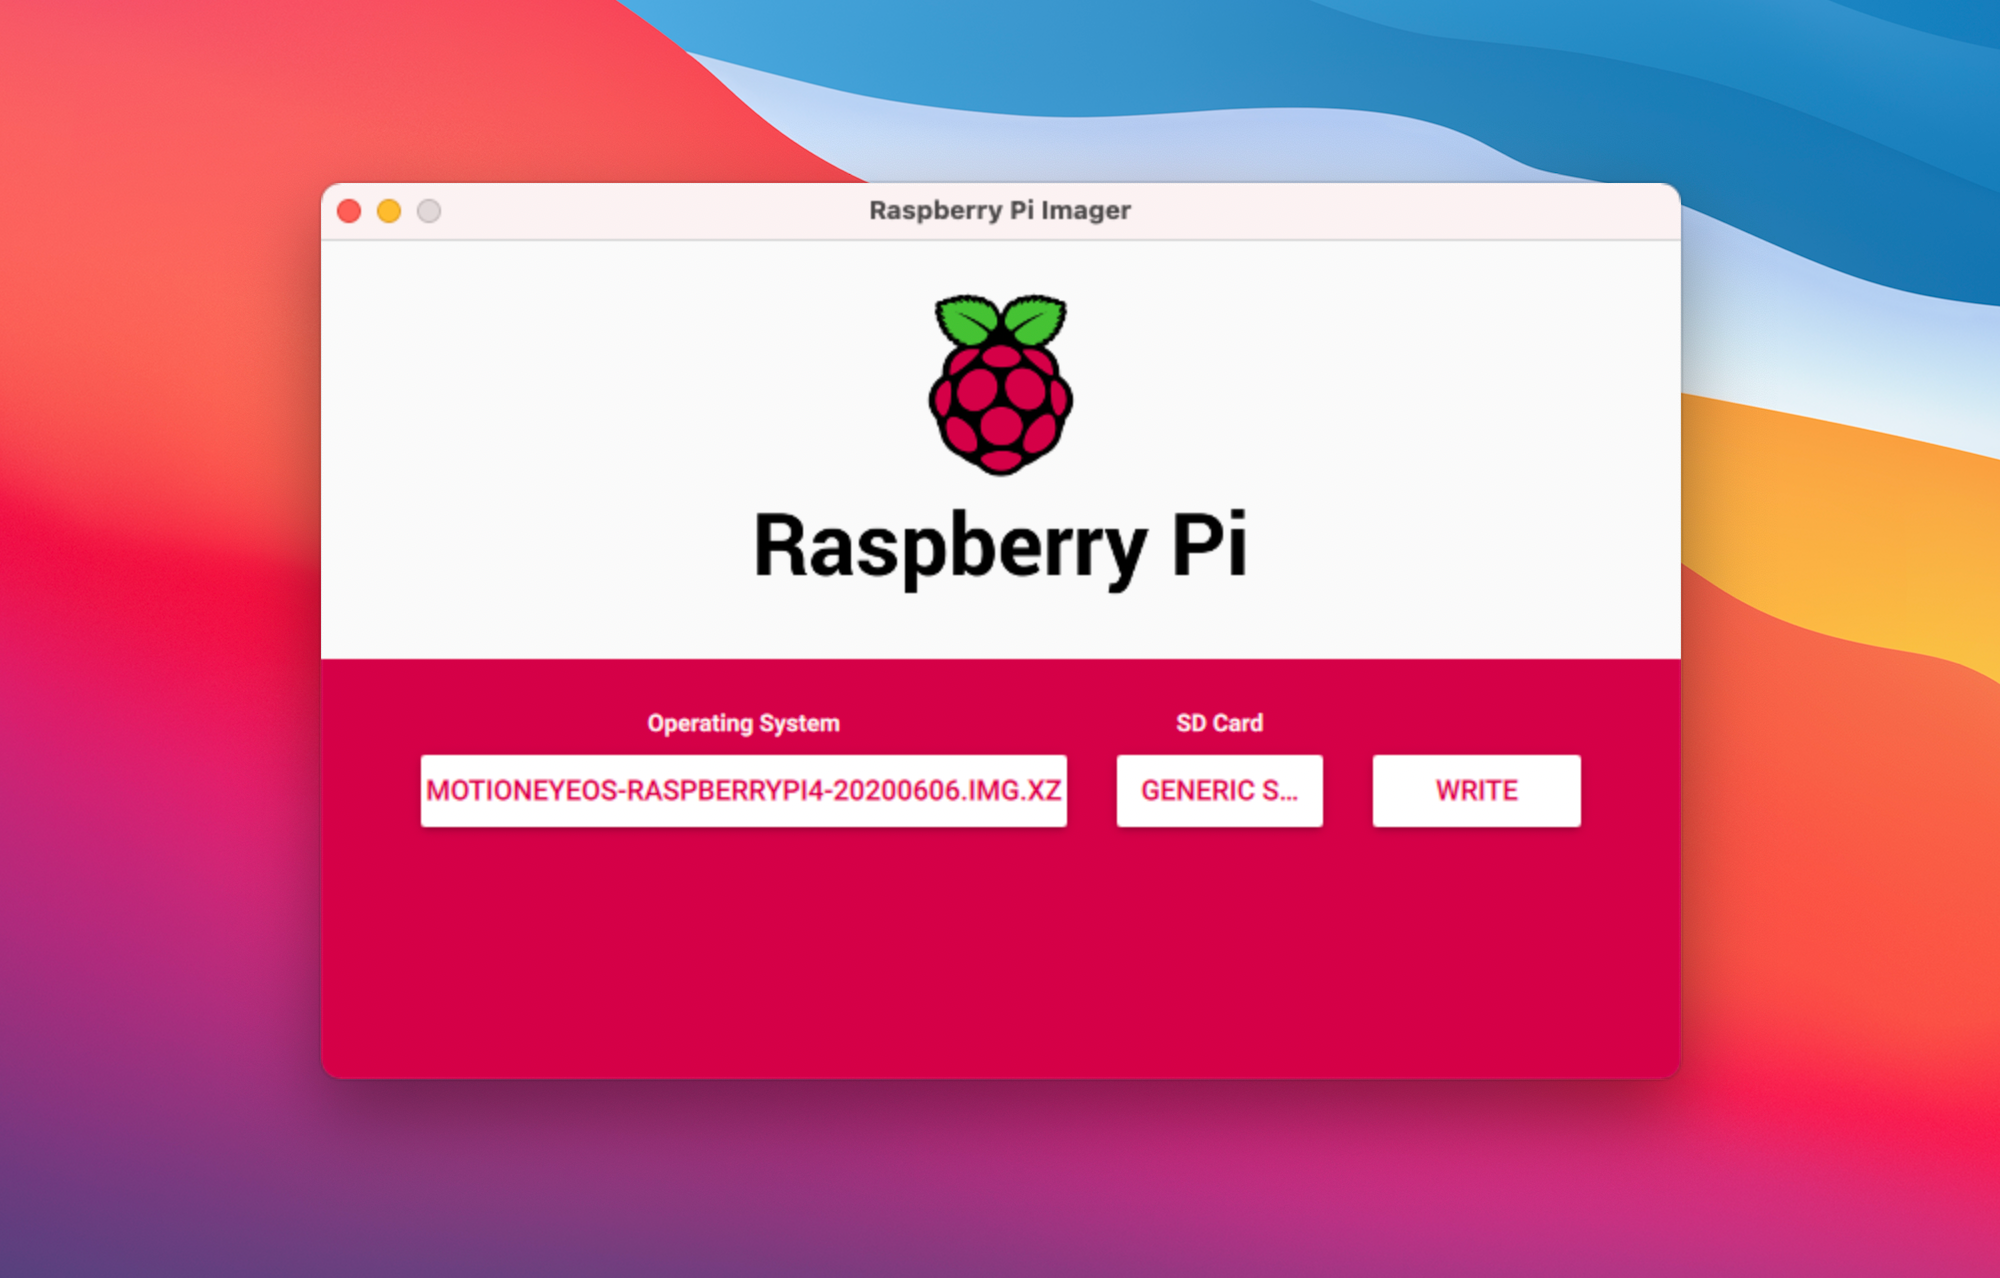
Finally, click on Write to write the prototype to the card.
2. Preconfigure Your Wireless Connection
Before using the microSD card in your Raspberry Pi, you will want to preconfigure the wireless network credentials.
Open a plain text editor (such equally Text Editor on macOS or Notepad on Windows) and enter the following lines, replacing the ssid and psk values with the SSID (name) and countersign for your own wireless router. You should also alter the country code to the one where the device volition exist operating.
          land=U.s.a.
update_config=1
ctrl_interface=/var/run/wpa_supplicant              network={
              scan_ssid=ane
              ssid="MyWiFiSSID"
              psk="MyWiFiPassword"
              }
Salvage the file as wpa_supplicant.conf to the root of your microSD card, where yous should see other files such equally bootcode.bin and kernel.img. If the file saves with a .txt suffix, remove that so it's only chosen wpa_supplicant.conf.
3. Camera Setup
If y'all are using a Raspberry Pi Photographic camera Module or Loftier Quality Camera, connect it to the Raspberry Pi's Camera port. If using a webcam, connect to a USB port on the Raspberry Pi.
Insert the microSD card in your Raspberry Pi and power it up. If connected to a monitor, you will see a list of commands existence run. Once your wpa_supplicant.conf file is successfully read, information technology will then connect to your network and show the Raspberry Pi's IP accost after Interface wlan0 has IP address:.
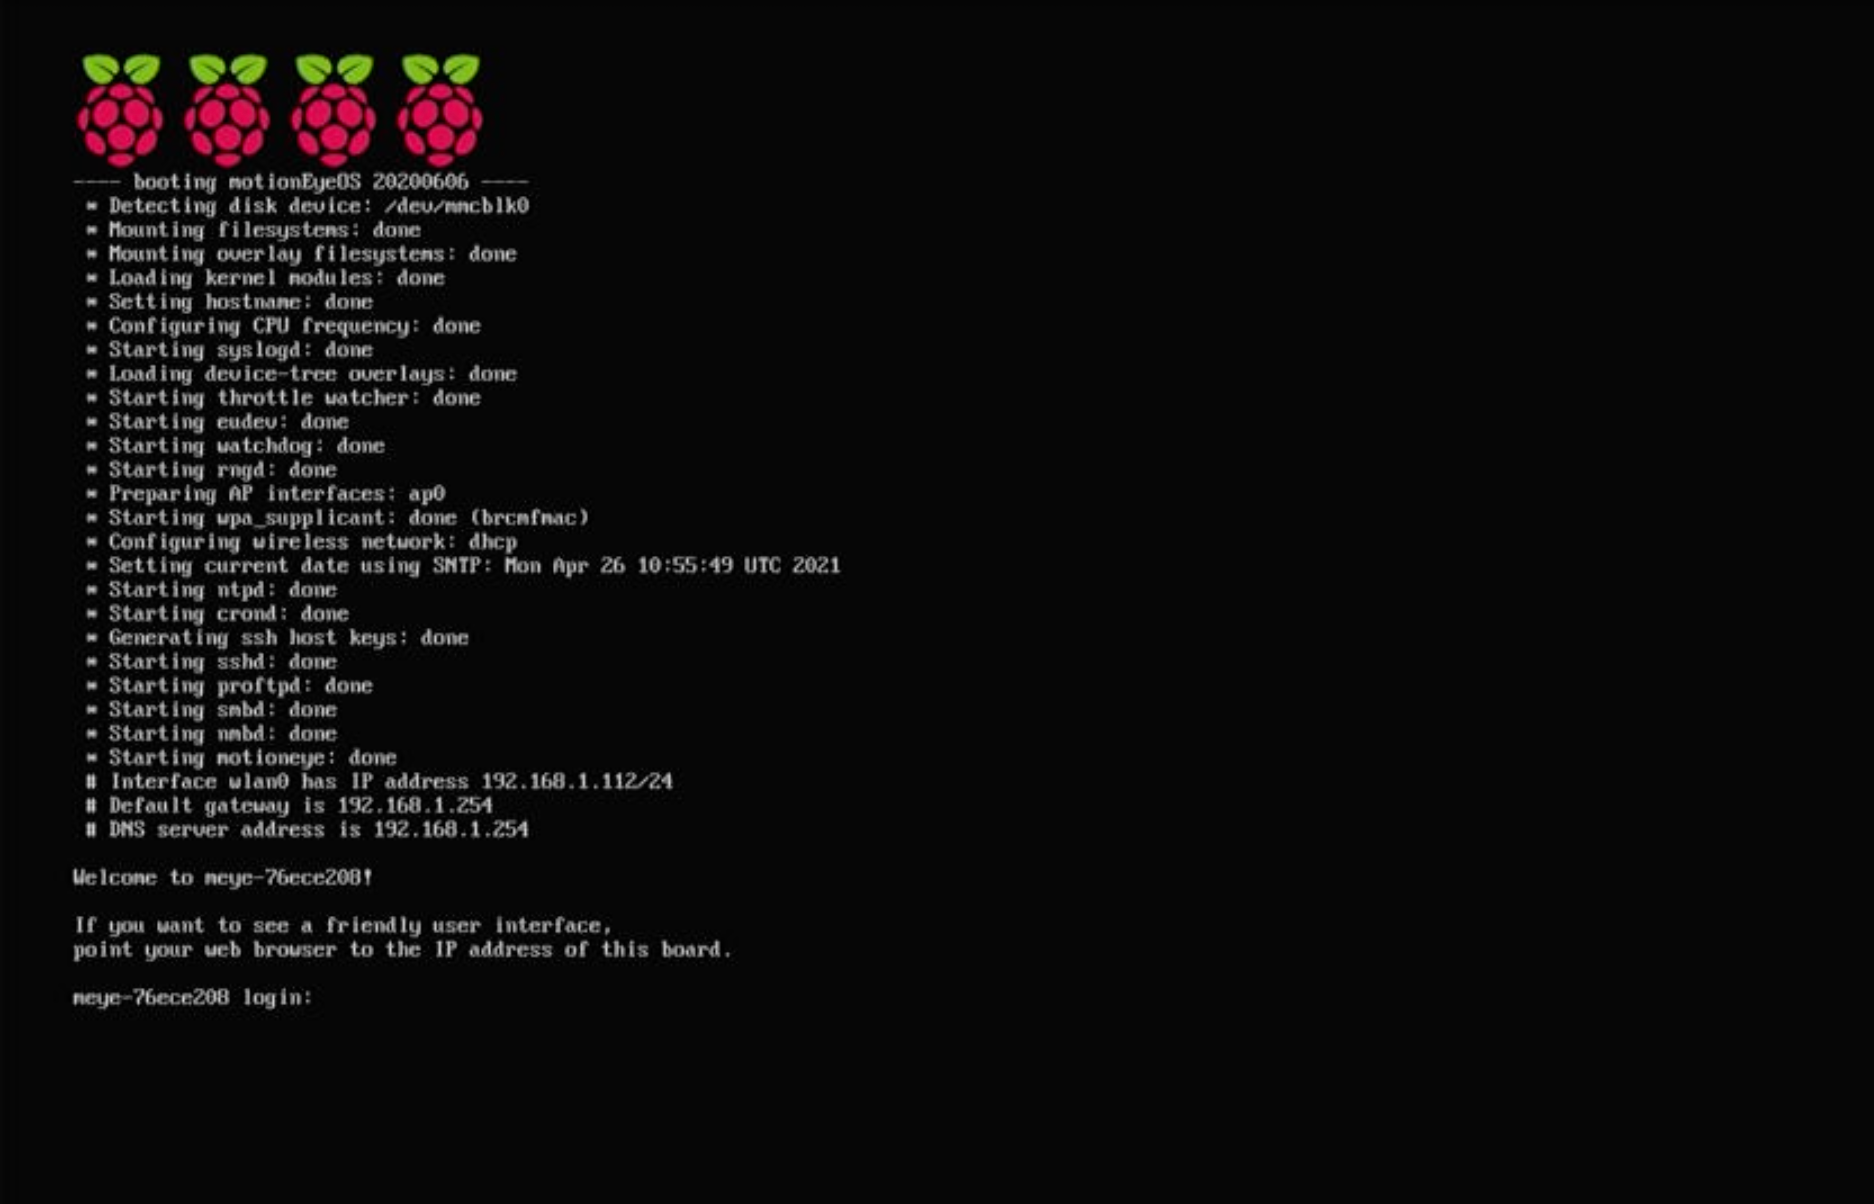
Alternatively, if your Raspberry Pi is not connected to a monitor, you could always discover the IP accost by visiting your wireless router's settings page in a spider web browser on another device and looking for a device with a name starting with meye-.
4. Access the Web Interface
In a web browser on another computer or device, enter the Raspberry Pi's IP accost and you should see a login screen. Just enter admin every bit the username, without a countersign.
If you have a Raspberry Pi Camera Module or High Quality Camera continued, information technology should exist detected automatically and you'll run across the camera view from it in the web interface. If using a USB camera, in the Add Camera menu that appears, select Local V4L2 Photographic camera for Photographic camera Type, and USB2.0 Camera: USB2.0 Camera for Camera.
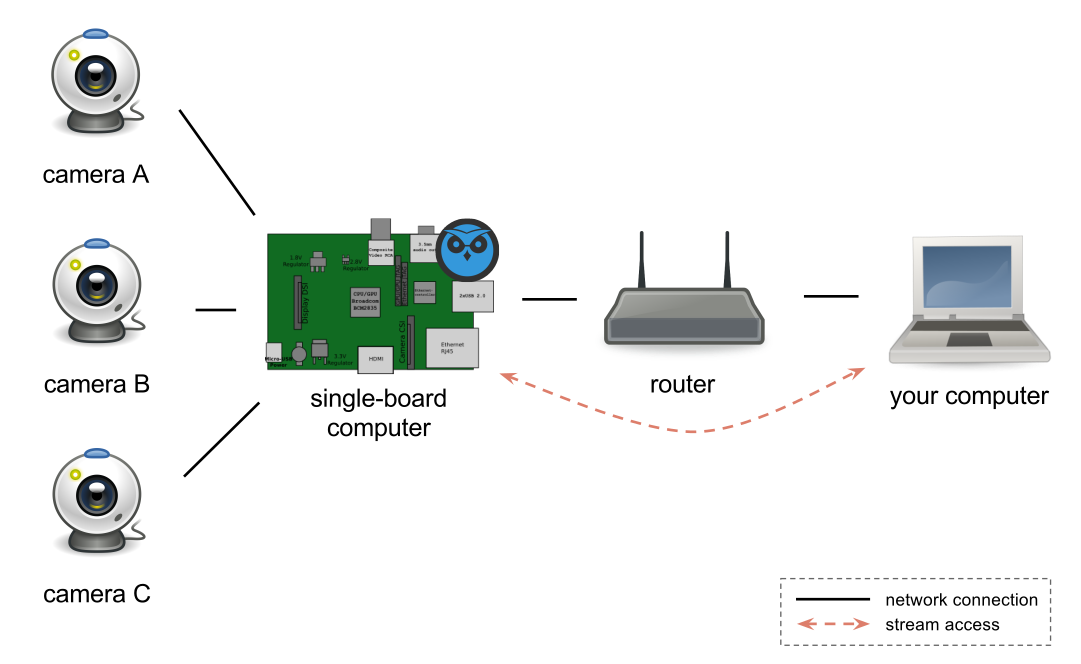
For a multi-photographic camera setup, it's possible to connect more than one camera to one Raspberry Pi, although the model used needs to be powerful enough to handle all the streams.
Alternatively, you lot can utilise multiple Raspberry Pi boards, each with a camera, and designate another Raspberry Pi as a hub to handle their streams. This is useful if you lot want to position cameras in unlike rooms.
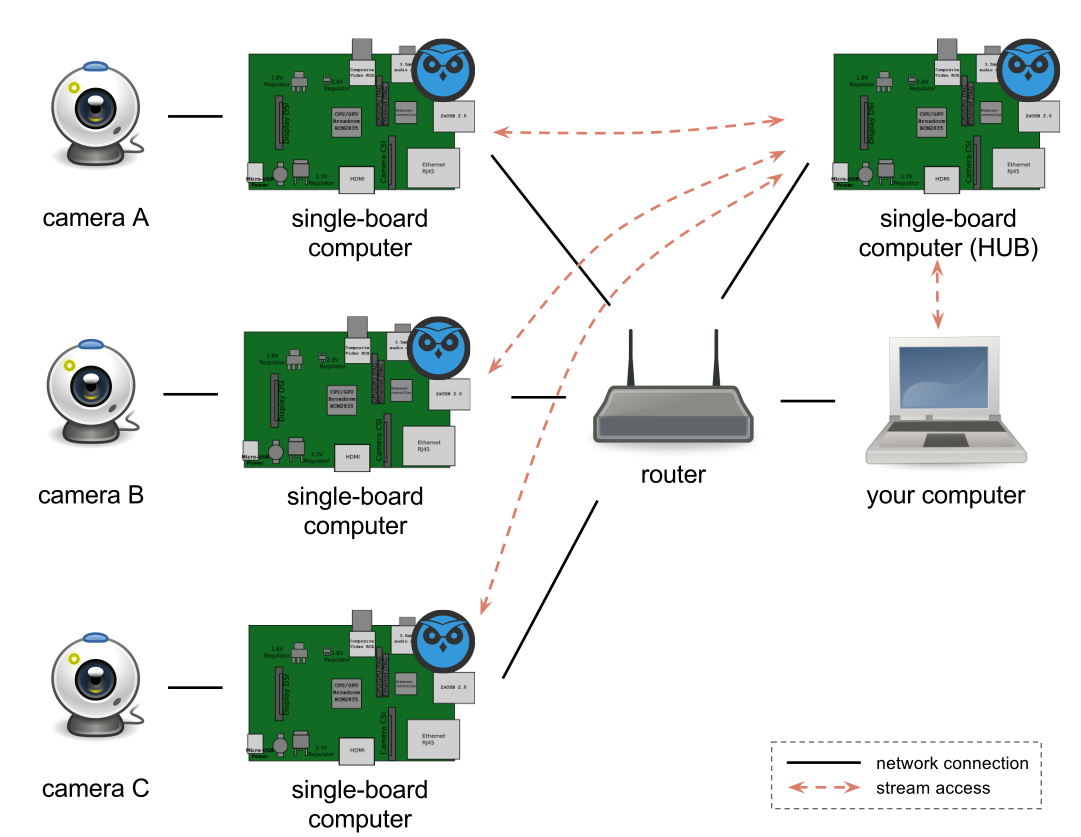
There'southward likewise the option of using a regular Linux computer as a central server.
five. Configure Custom Settings
In the web interface, click the 3 vertical lines icon at the summit left to open upwardly the settings console. In the Preferences bill of fare, change the Layout Columns selection to ane if using a single camera, and so the view fills the screen.
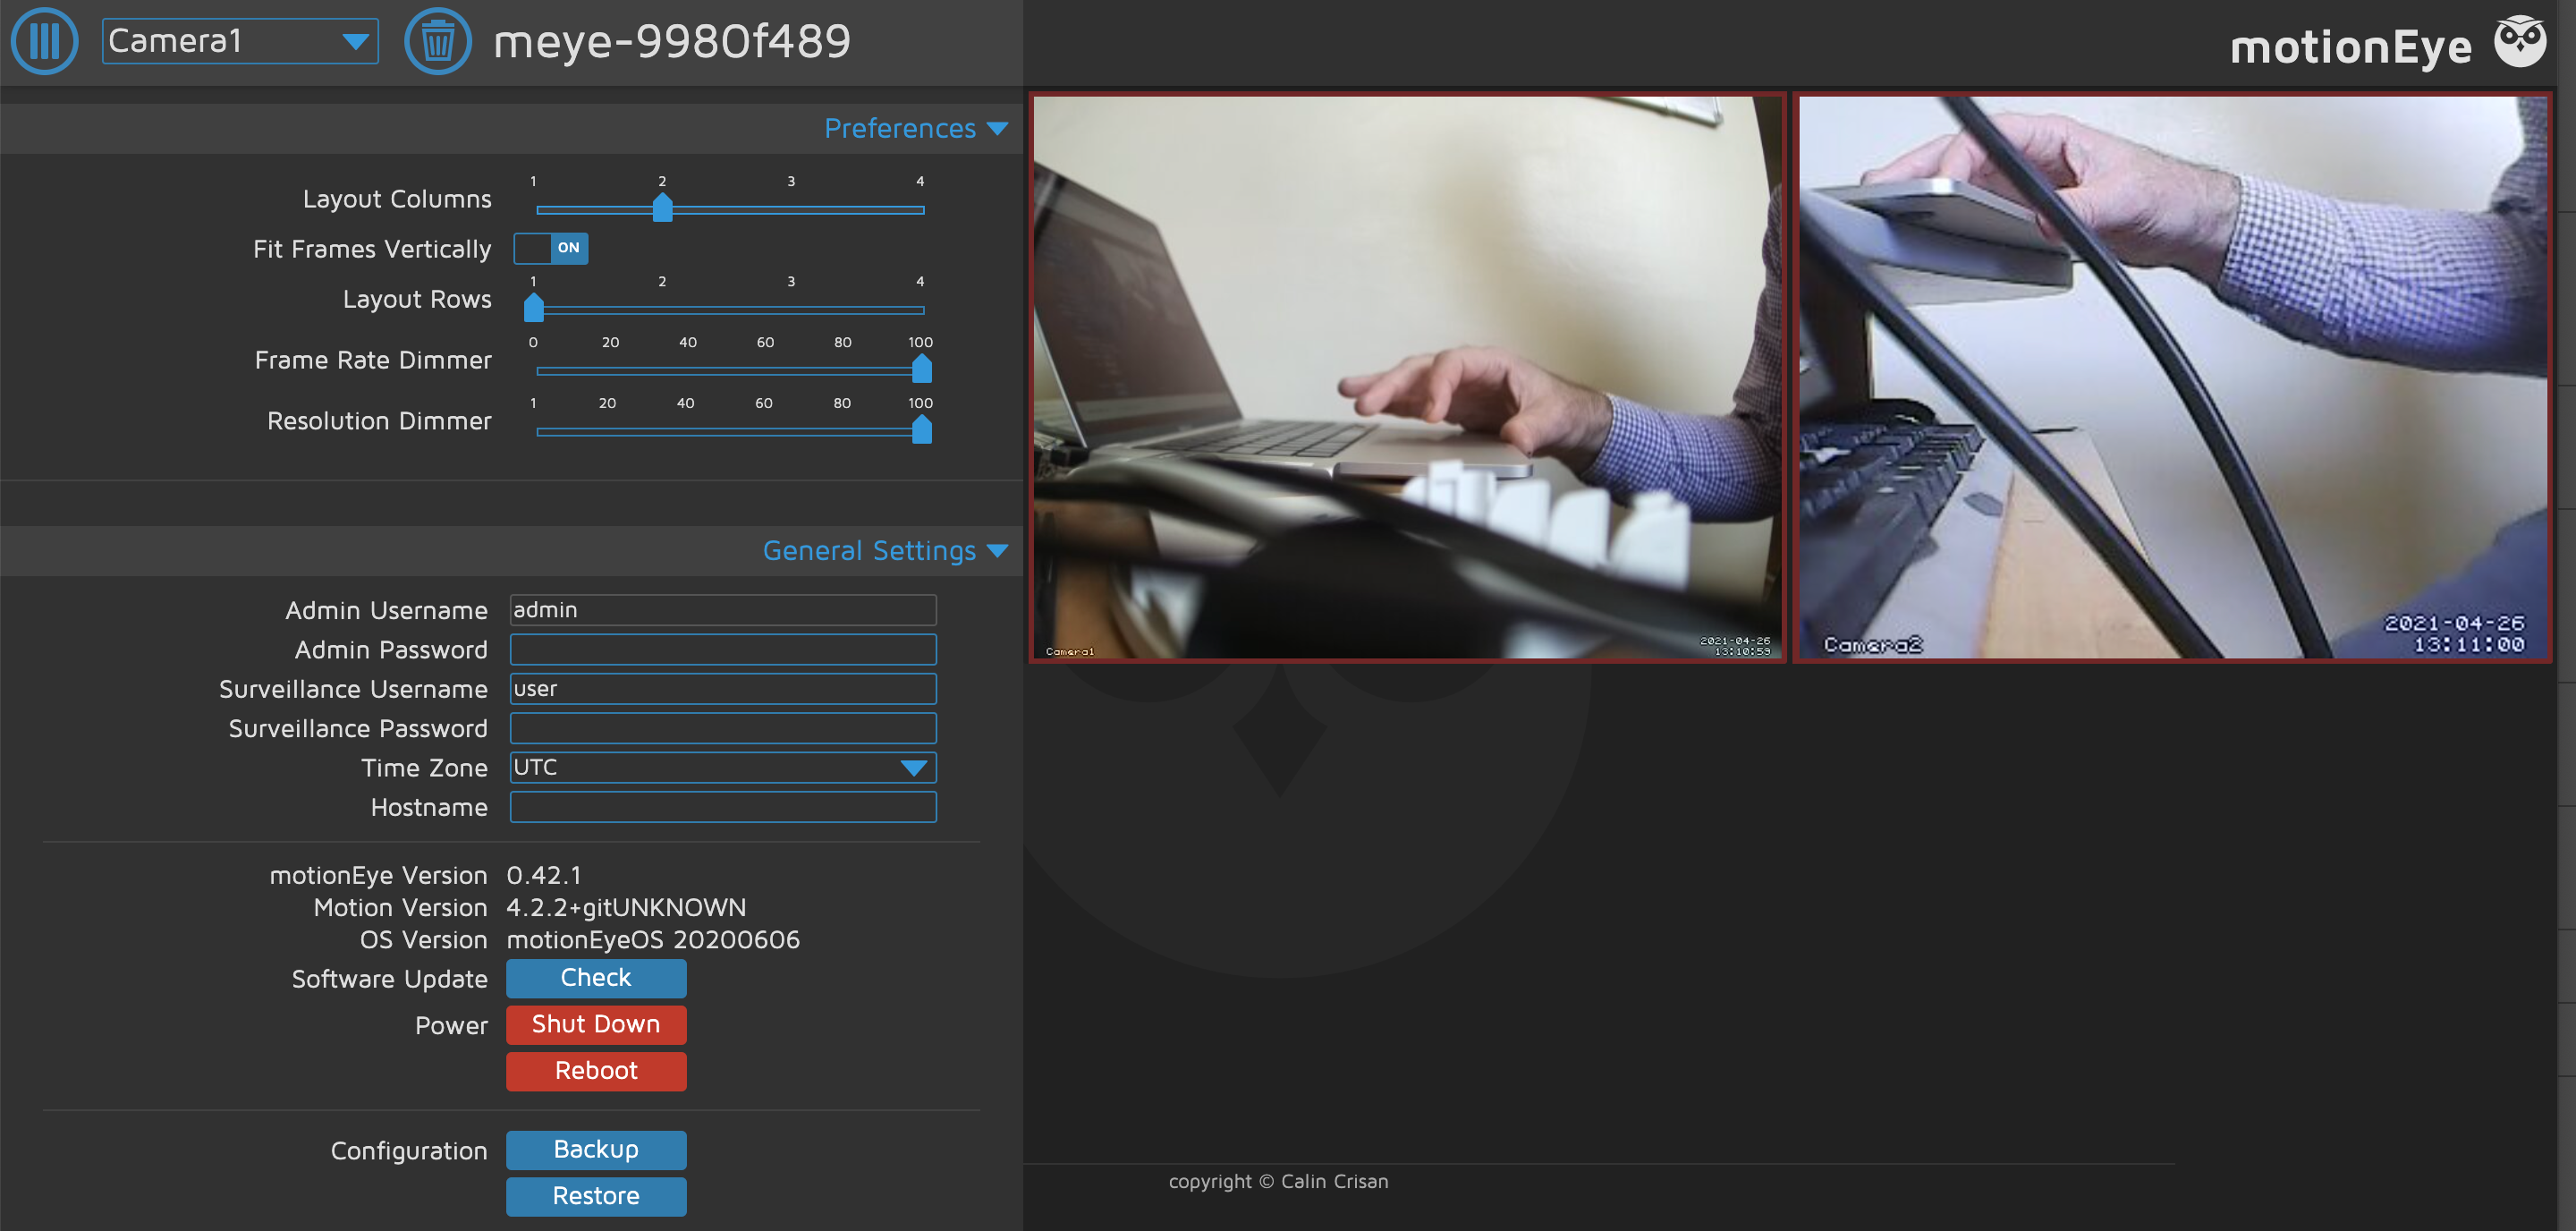
The Video Device menu lets you change the resolution, rotation, and frame rate for the currently selected camera. Yous can as well rename the photographic camera to something descriptive, such as the room it'due south in. Later on changing any menu settings, click the Employ button to apply them.
For your security camera setup, you will want to detect motility from the camera view. Open the Motility Detection menu and turn it to on. Other options enable you lot to set the Frame Modify Threshold required to detect motion. Setting information technology likewise depression may upshot in besides many imitation positives. The Motion Gap option is the filibuster earlier seeking to observe movement again afterward it has been triggered.
To view movies captured from motion detection, click on a alive camera view and and so select the triangular play button icon. It's also possible to view even so images captured by the camera – either manually or by setting the Capture Mode in the Nevertheless Images menu to Move Triggered.
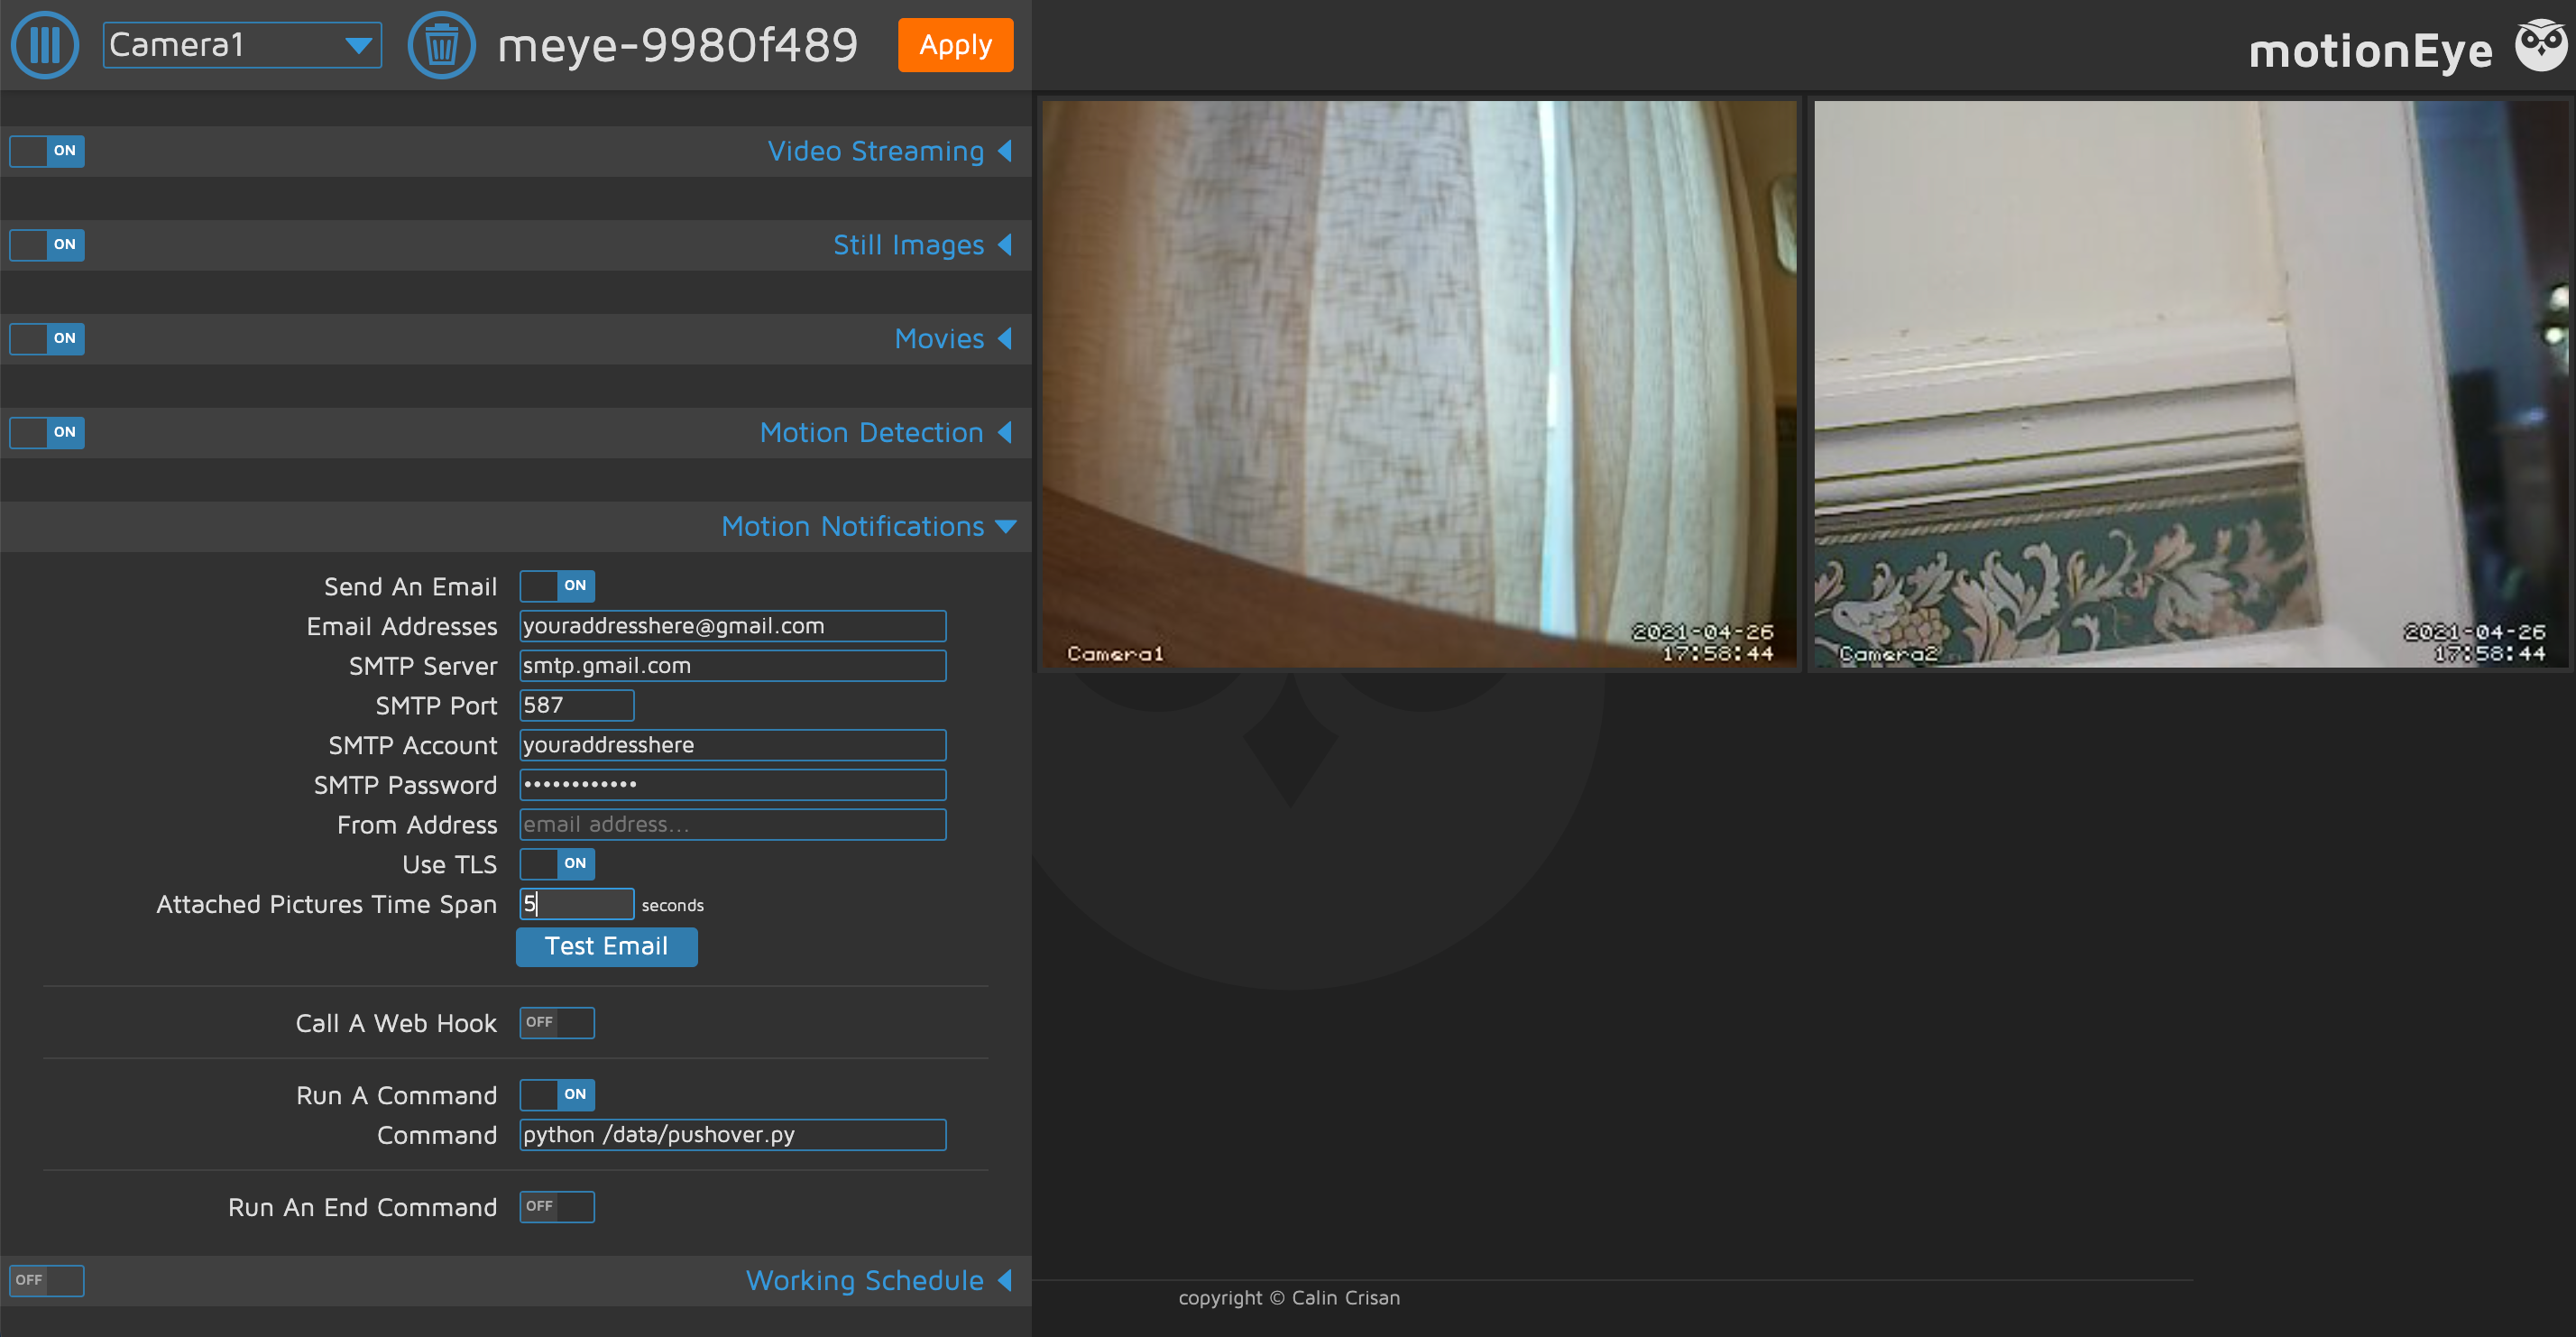
vii. Ship Email Notifications
The Motion Notifications card enables you to send yourself an email whenever motion is detected. After turning it on, enter the Email Address yous want to ship the notification to. You will need to enter the other settings for your business relationship.
If using Gmail, set the SMTP Server to smtp.gmail.com, the SMTP Port to 587, and the SMTP Account to the first function of your email address (i.e. without @gmail.com). The SMTP Password is the one you use to log in to your Gmail account. The From Accost can be left bare or set up to a custom address. Set TLS to on.
In another browser tab, visit the Security carte for your Google account and set Less secure app access to on – later on receiving a security alarm, ostend that it was y'all who inverse it. Note that this is done at your own adventure. We set upward a dedicated new Gmail account for this purpose.
Yous should now exist able to send a Test Email from motionEyeOS without triggering a Google security alert. Note that if using multiple cameras, you need to fix e-mail notifications for each ane separately.
To receive an prototype with your e-mail notification, you lot're advised to ready the Attached Pictures Time Span selection to betwixt v and 30. You as well need to set Capture Mode to Motion Triggered in the Nevertheless Images menu.
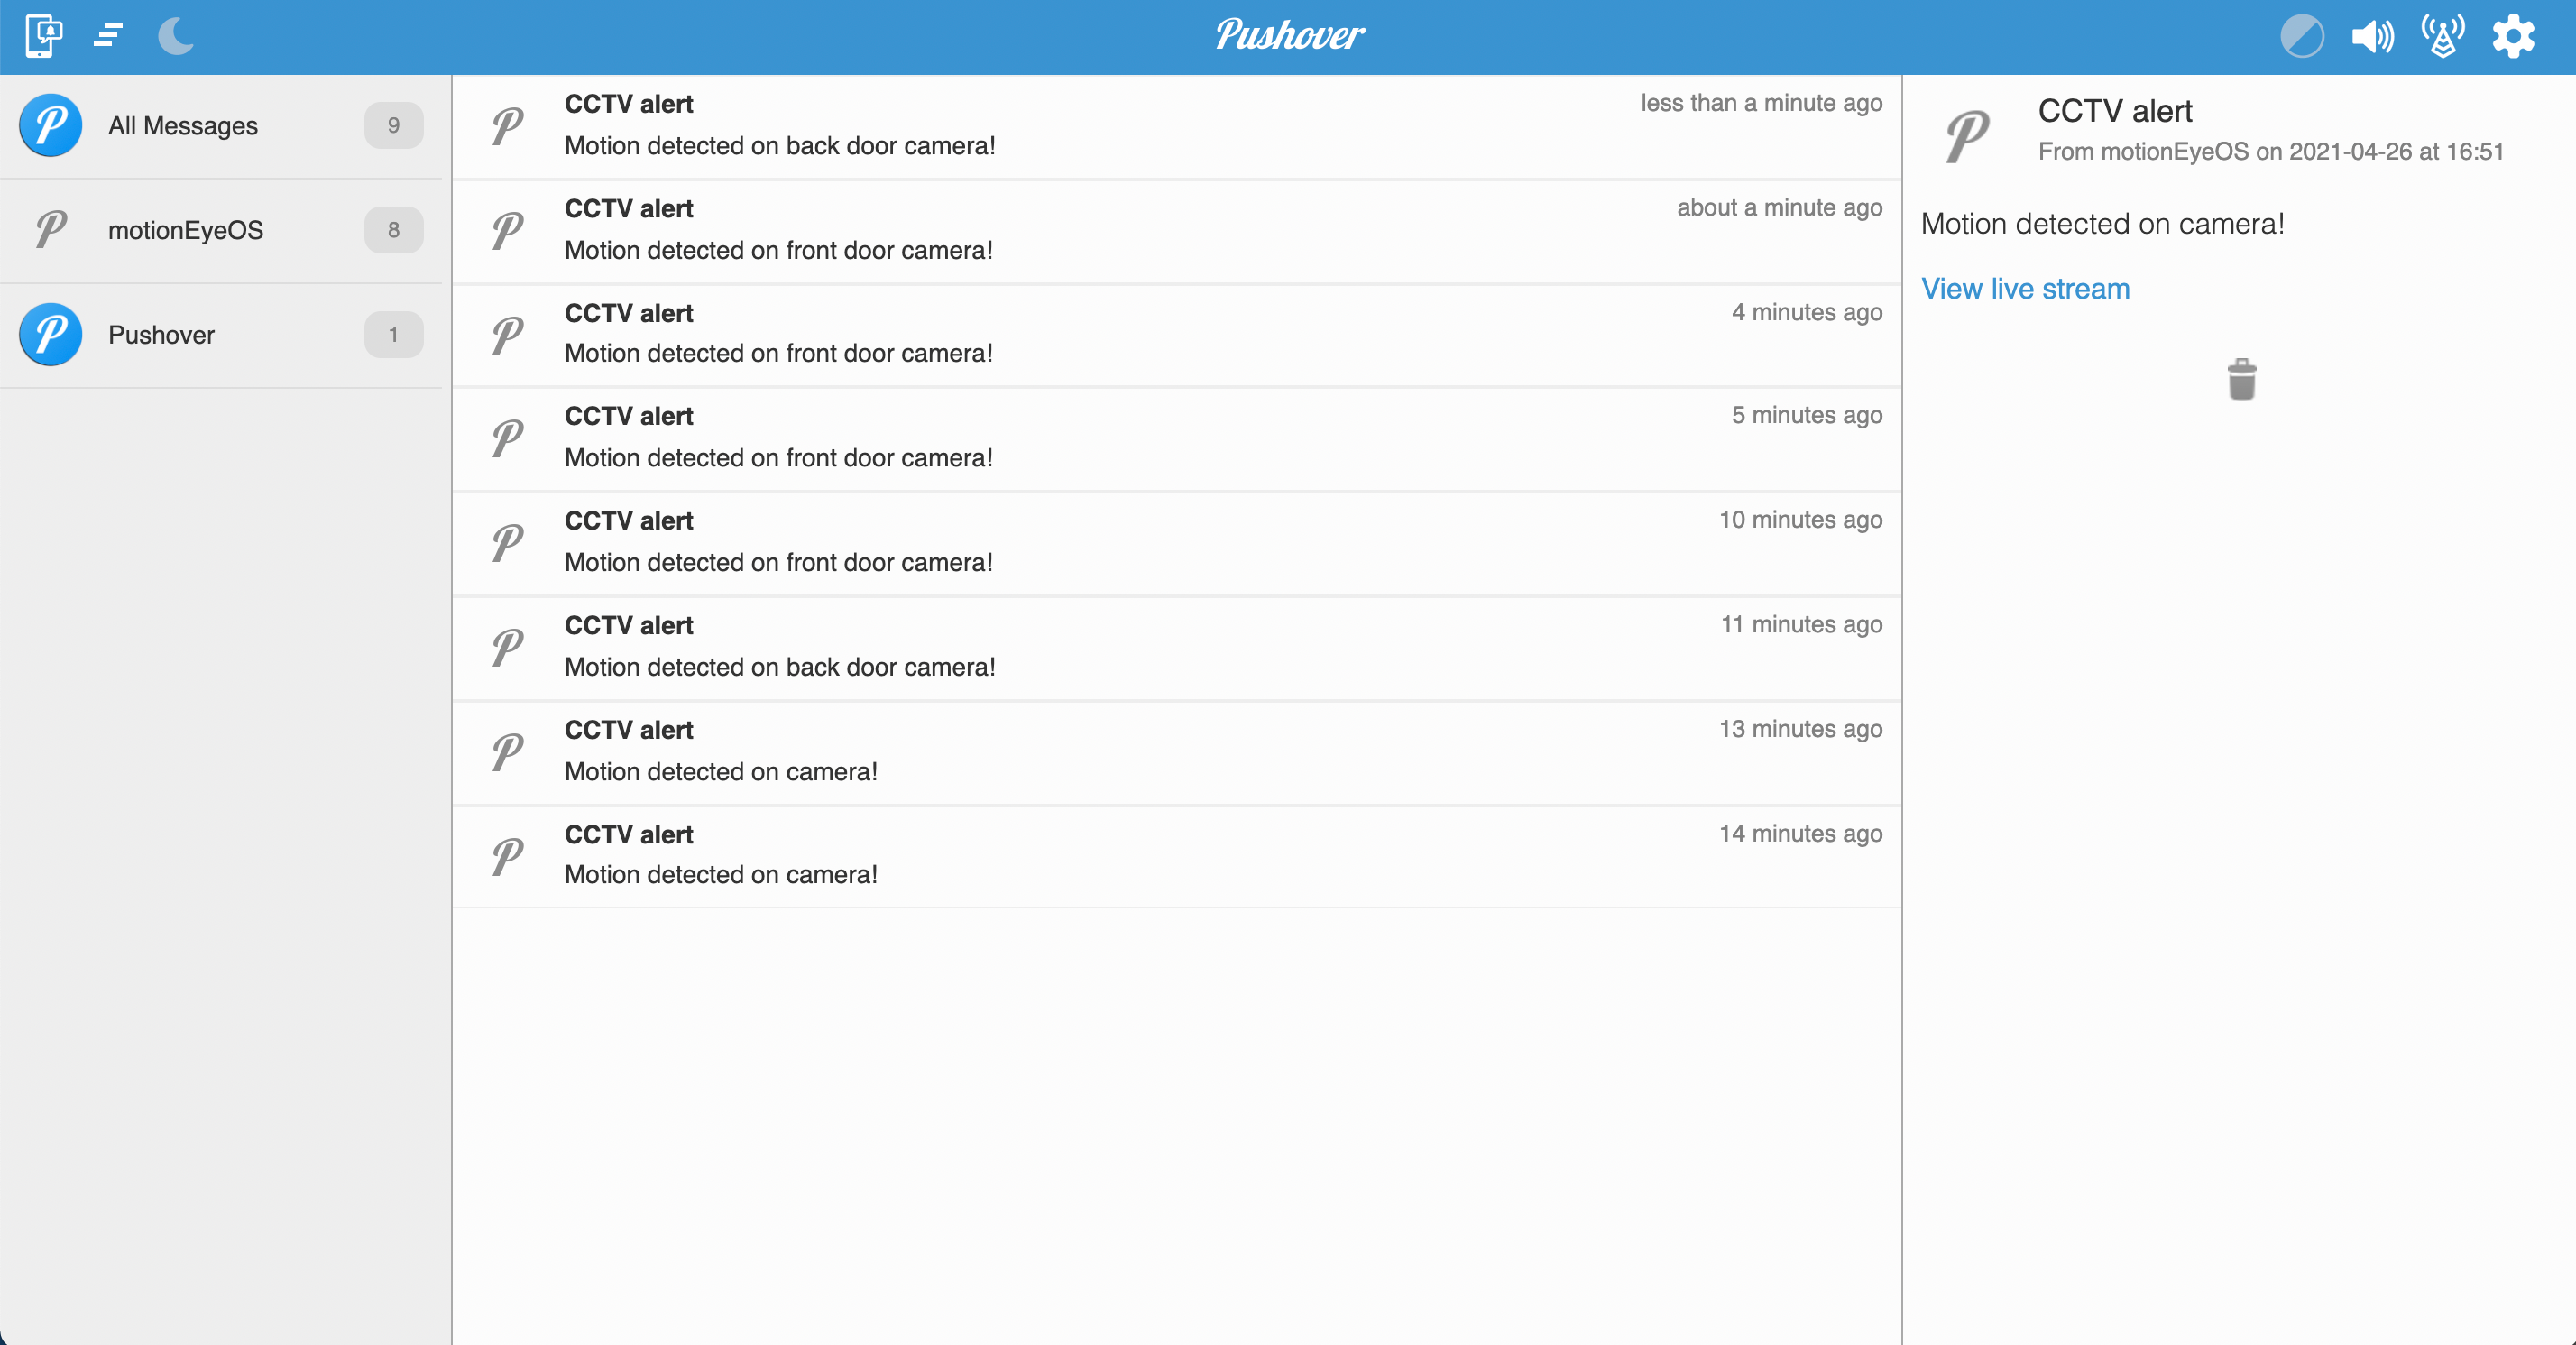
8. Add Push button Notifications
You tin as well ship push notifications using the Run A Command option in the Motility Notifications card. For case, to use the Pushover service – which offers apps for Android, iOS, and desktop – you lot need to create a brusque Python script for it to run.
Sign up for Pushover. Keep in heed that later on a 30-twenty-four hours gratis trial, you'll need to make a 1-off $v in-app purchase to keep using it.
Afterward that, click on Create an Application/API Token. Notation down the API Token/Key given for it, along with your User Fundamental from the dashboard.
Download: Pushover for iOS | Android (Free trial available)
Using the boilerplate code from the Pushover website, you can create your Python script:
                      import            httplib, urllib
conn = httplib.HTTPSConnection("api.pushover.internet:443")
conn.request("POST",            "/i/messages.json",
            urllib            .urlencode({
            "token":            "abc123",
            "user":            "user123",
            "title":            "CCTV alert"
            "message":            "Movement detected on photographic camera 1!",
            "url":            "http://IP.ADD.RE.SS",
            "url_title":            "View live stream",
            }), {            "Content-type":            "application/x-www-form-urlencoded"            })
            conn            .getresponse()
Replace abc123 with your app'southward API Token, and user123 with your User Fundamental. Supercede IP.ADD.RE.SS with your motionEyeOS setup'due south IP address.
To identify this on your motionEyeOS arrangement, yous need to SSH in from another computer using the Terminal awarding (or WinSCP on Windows), by entering:
ssh admin@&IP_ADDRESS Supplant IP_ADDRESS with the IP address of your motionEyeOS organisation. At present enter:
cd /data Now you are in the information directory, create a new file chosen pushover.py:
nano pushover .py Paste or blazon your Python script into it and salve with Ctrl + Ten, followed past Y. Now brand it executable with:
chmod +x pushover .py Alternatively, in WinSCP on Windows, press F9, prepare the permissions to 0775, and press OK.
Test the script by running:
python pushover .py You should receive a notification, with aural alert, from motionEyeOS in your Pushover app.
Back in the motionEyeOS web interface Motion Notifications carte du jour, turn on the Run A Control pick and type python /data/pushover.py into the Command field to tell it to run your Python script.
Click the Apply button. Annotation that yous can employ a different Run A Command script for each photographic camera in your setup, so you could create multiple Python scripts, each saying which photographic camera has been detected movement.
Making Your Ain DIY Security Camera Organization
Congratulations, yous have at present set upward your own customisable CCTV security organization using Raspberry Pi, consummate with electronic mail and push button notifications to alarm you to the presence of any intruders detected on camera.
About The Author

Source: https://www.makeuseof.com/create-a-multi-camera-cctv-system-with-raspberry-pi-and-motioneyeos/
Posted by: herreravised1943.blogspot.com
0 Response to "How To Make A Rpi 0 Security Camera"
Post a Comment